Using Creator Studio to Make and Schedule Facebook Reels

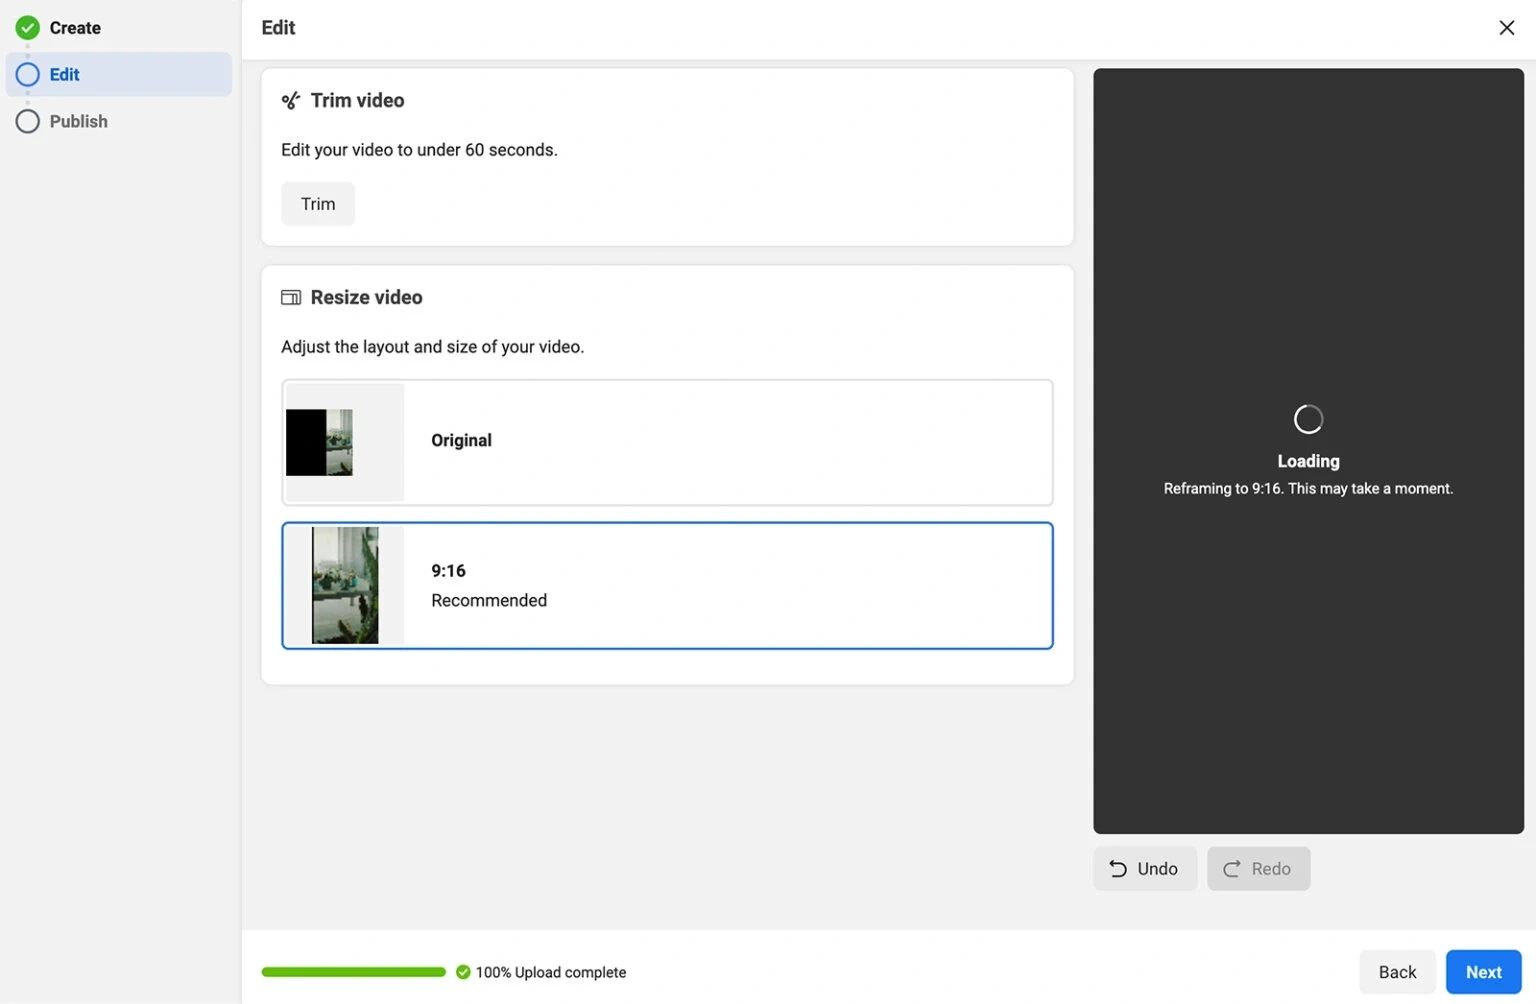
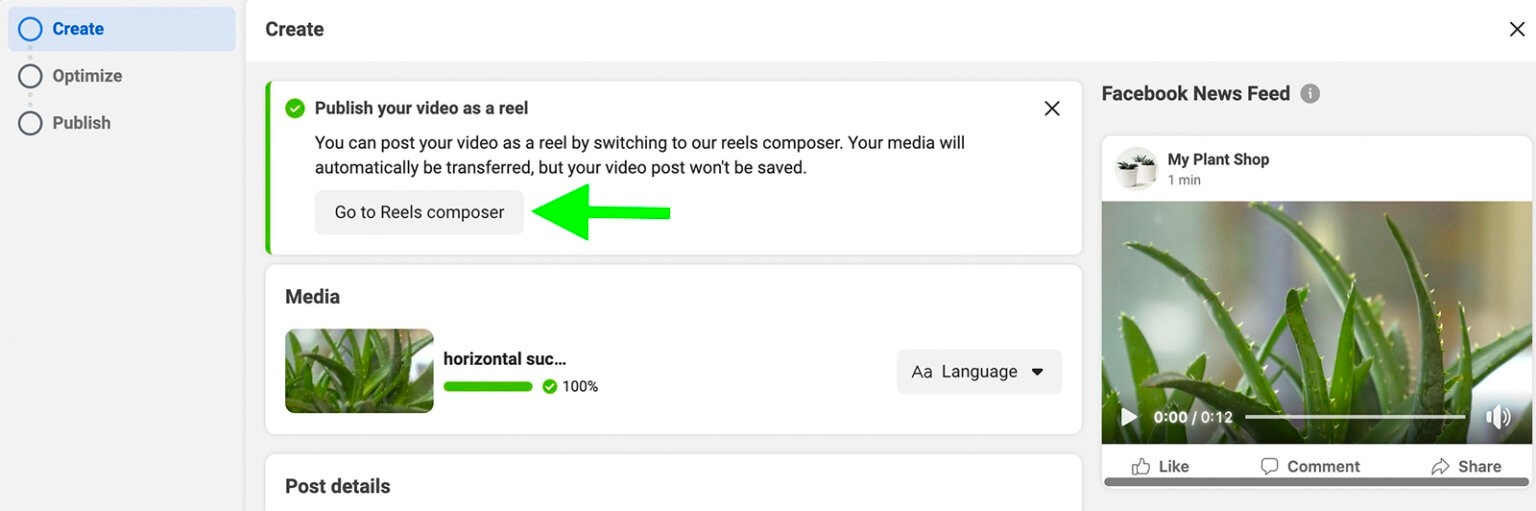
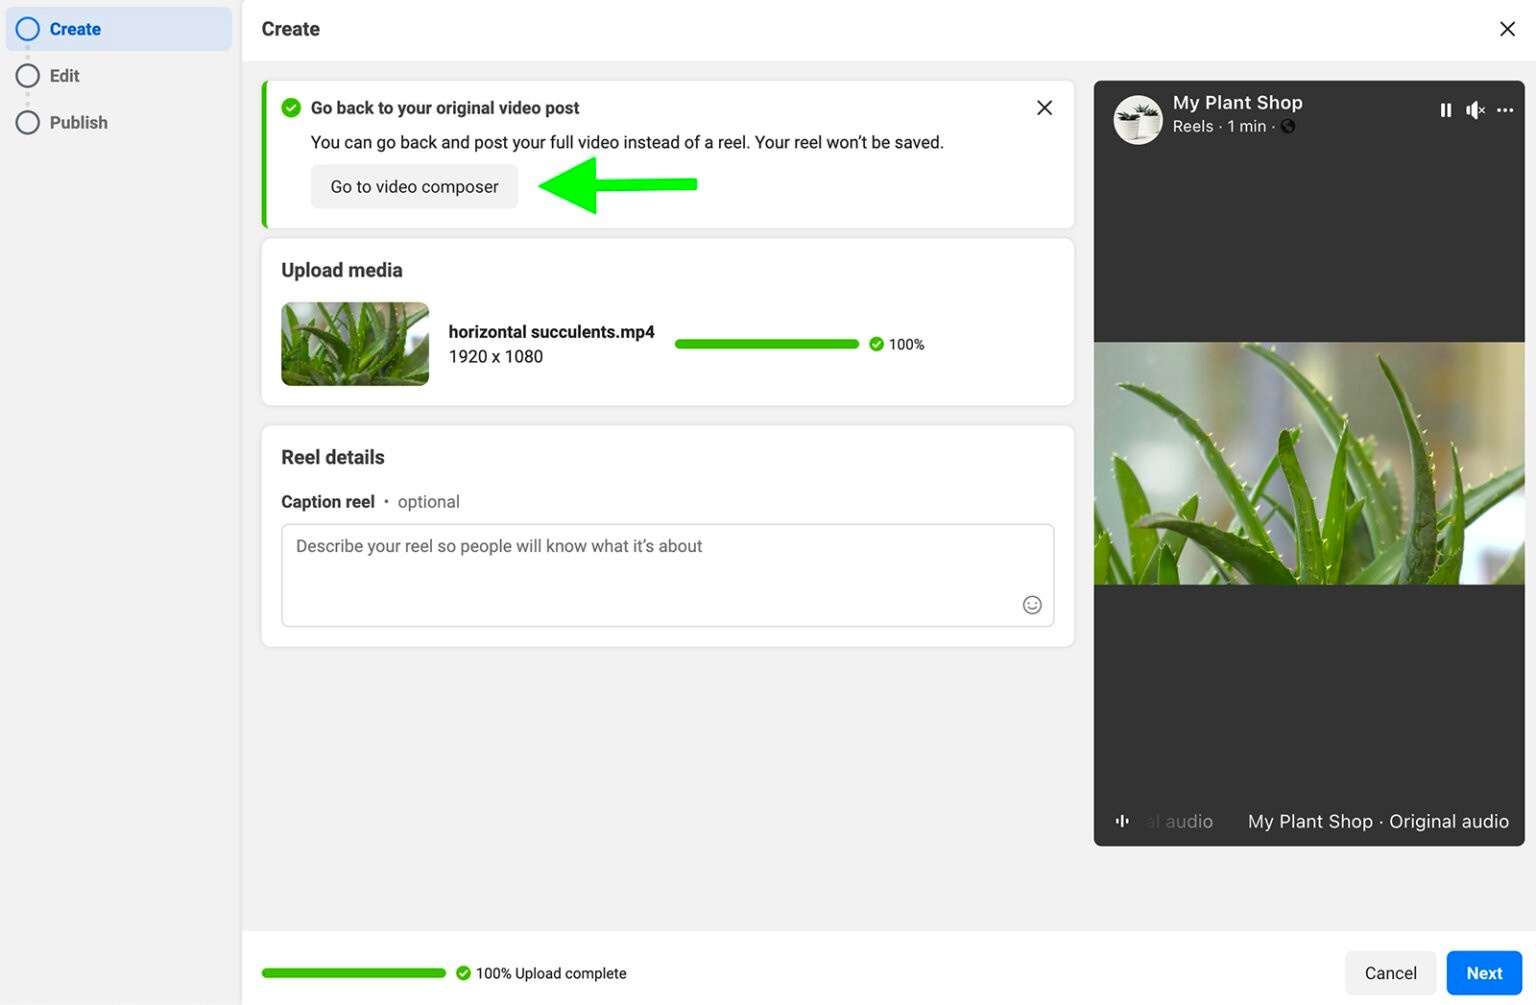
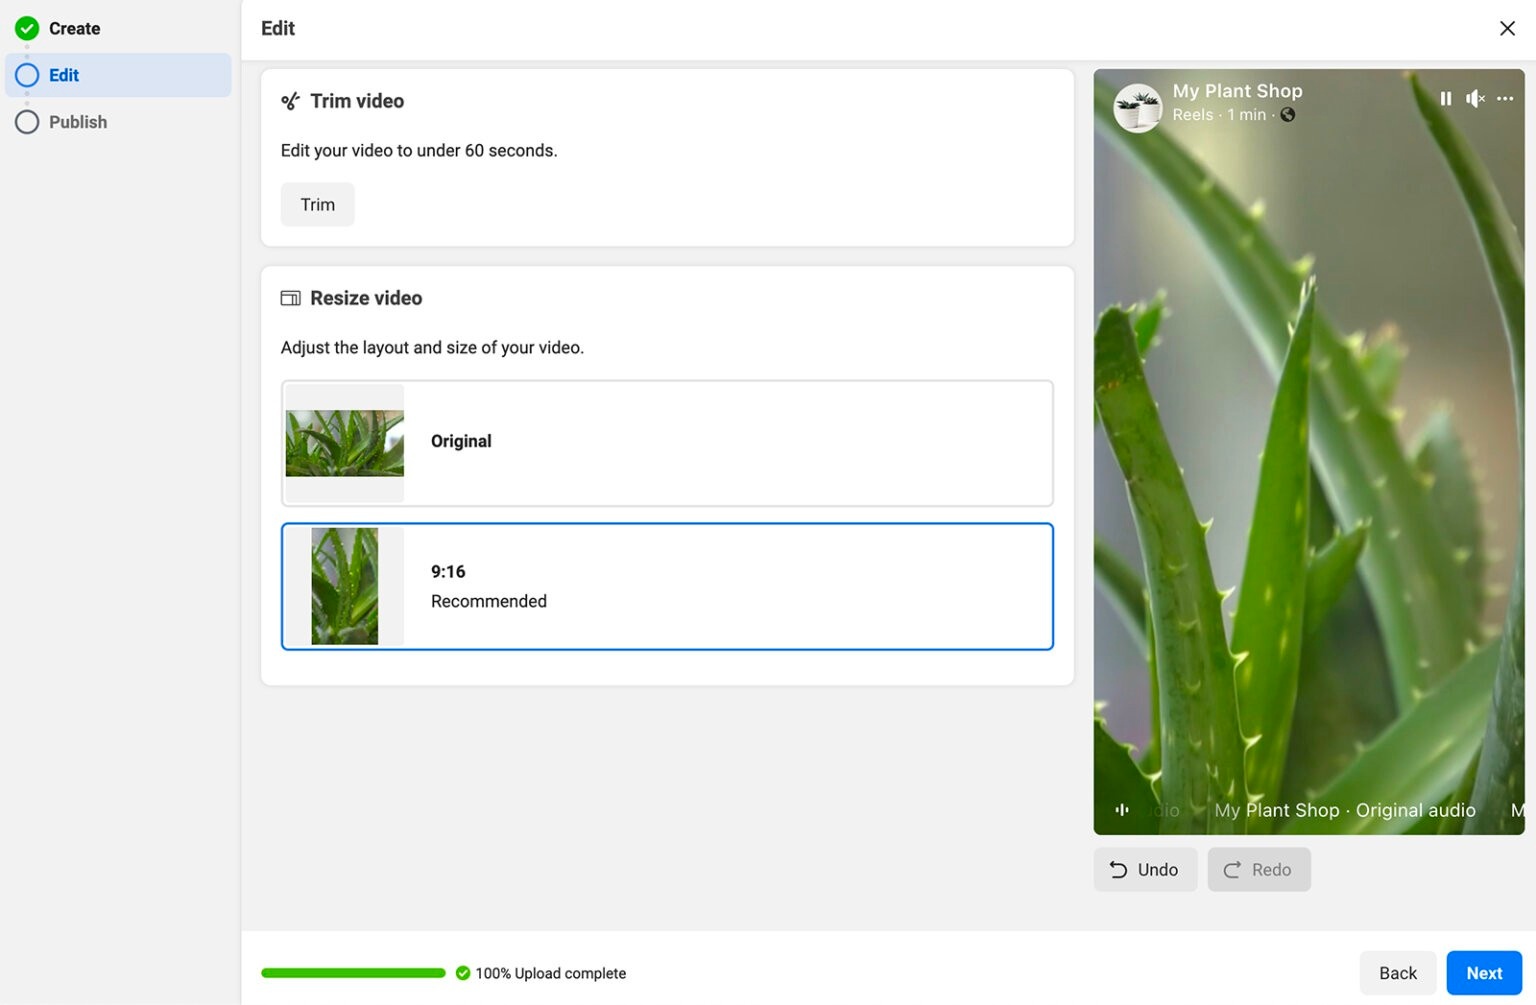
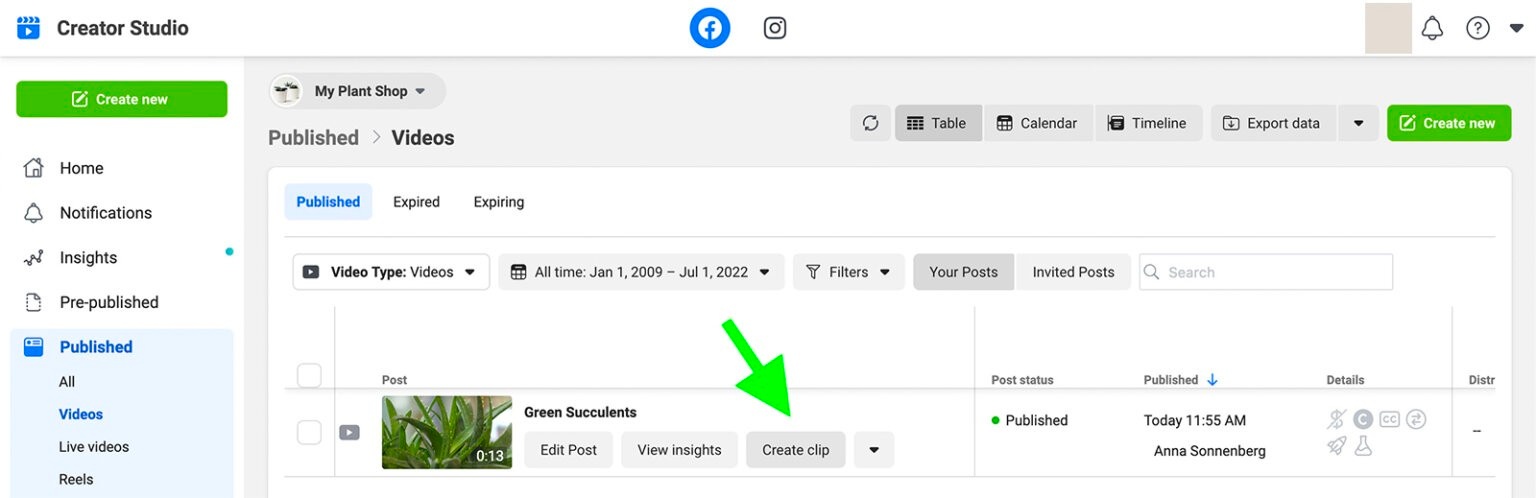
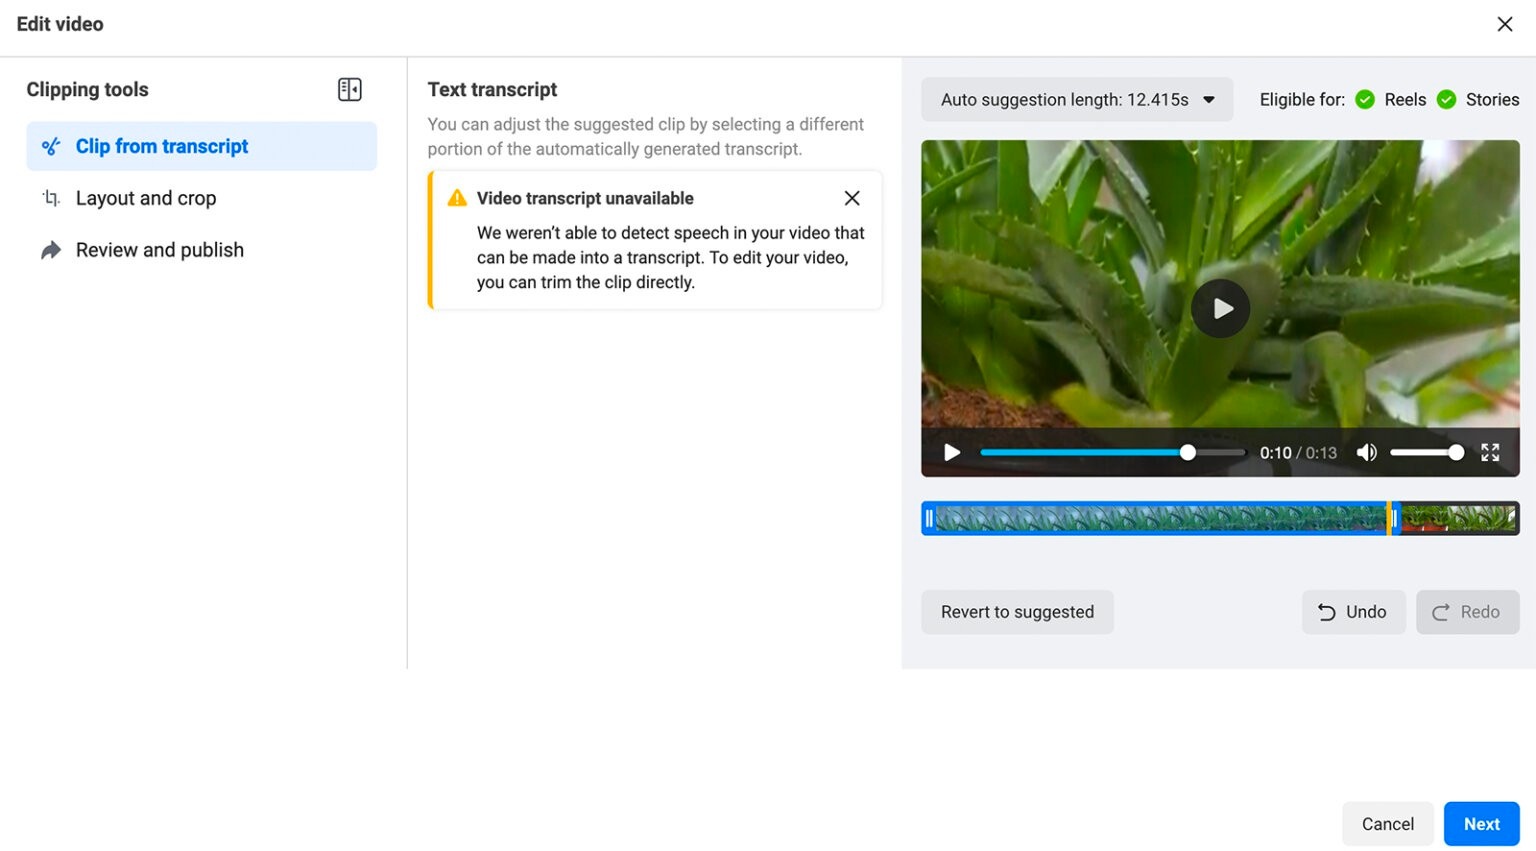
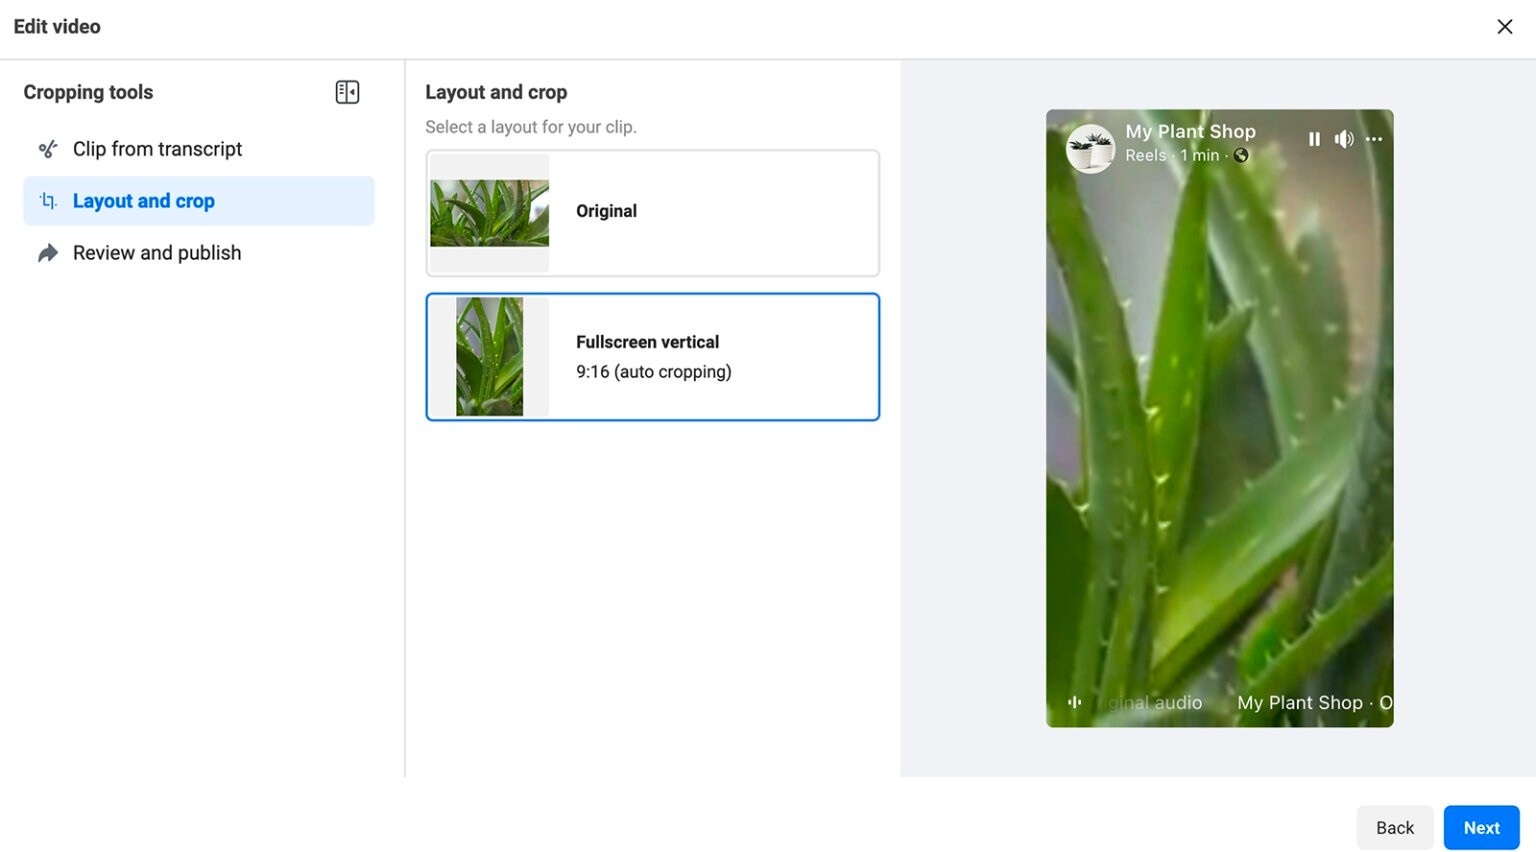
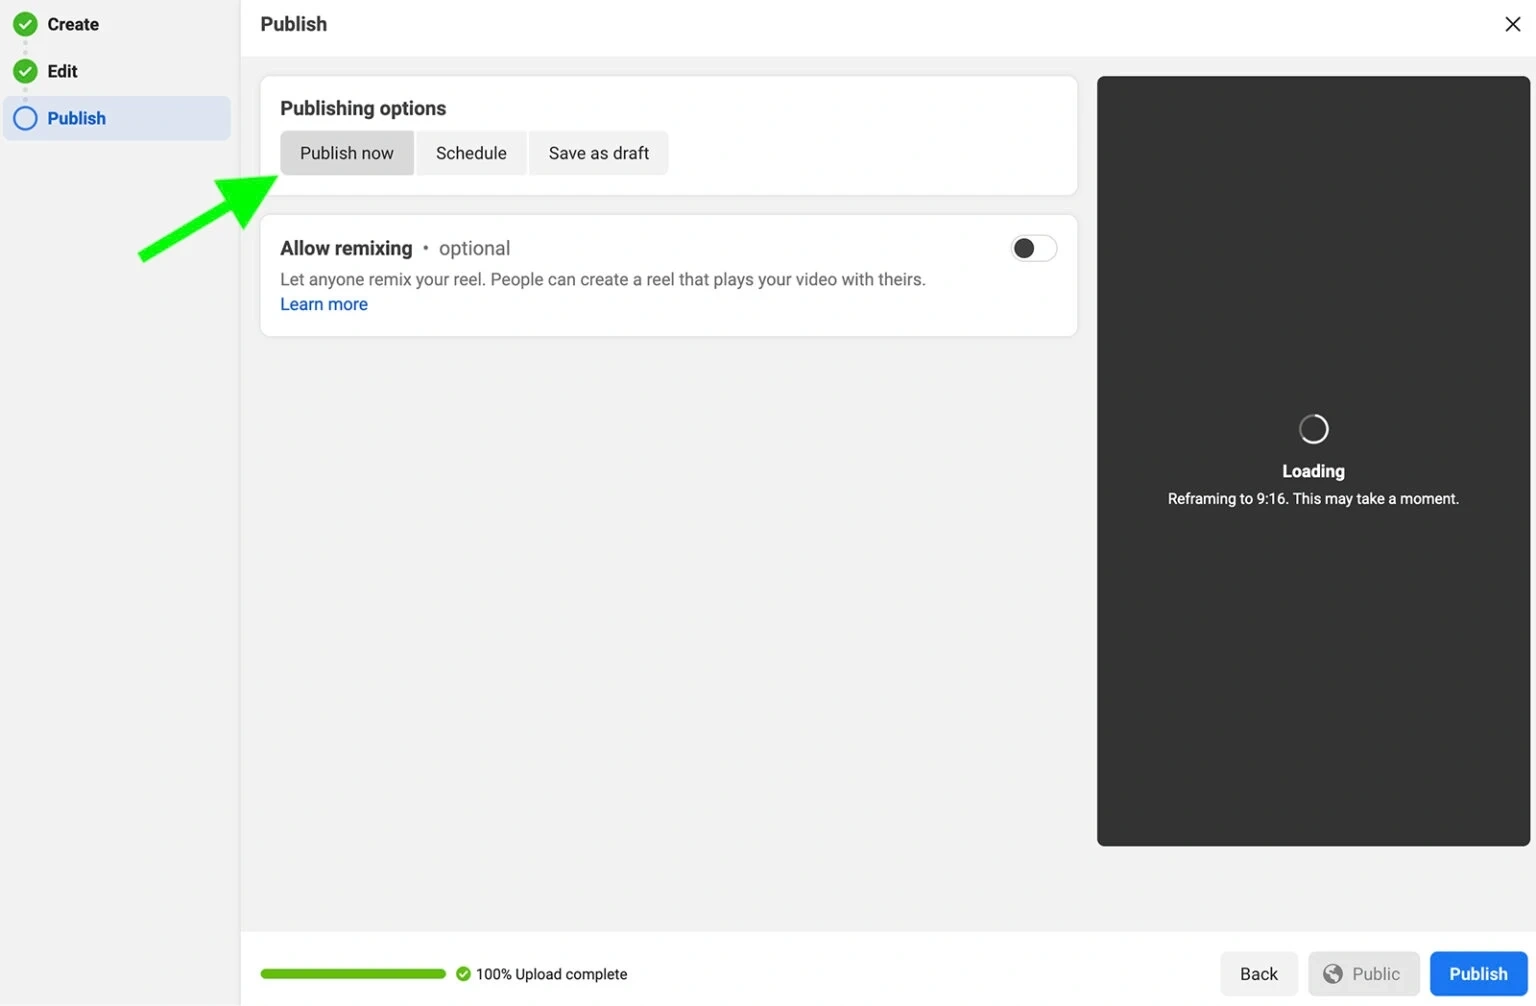
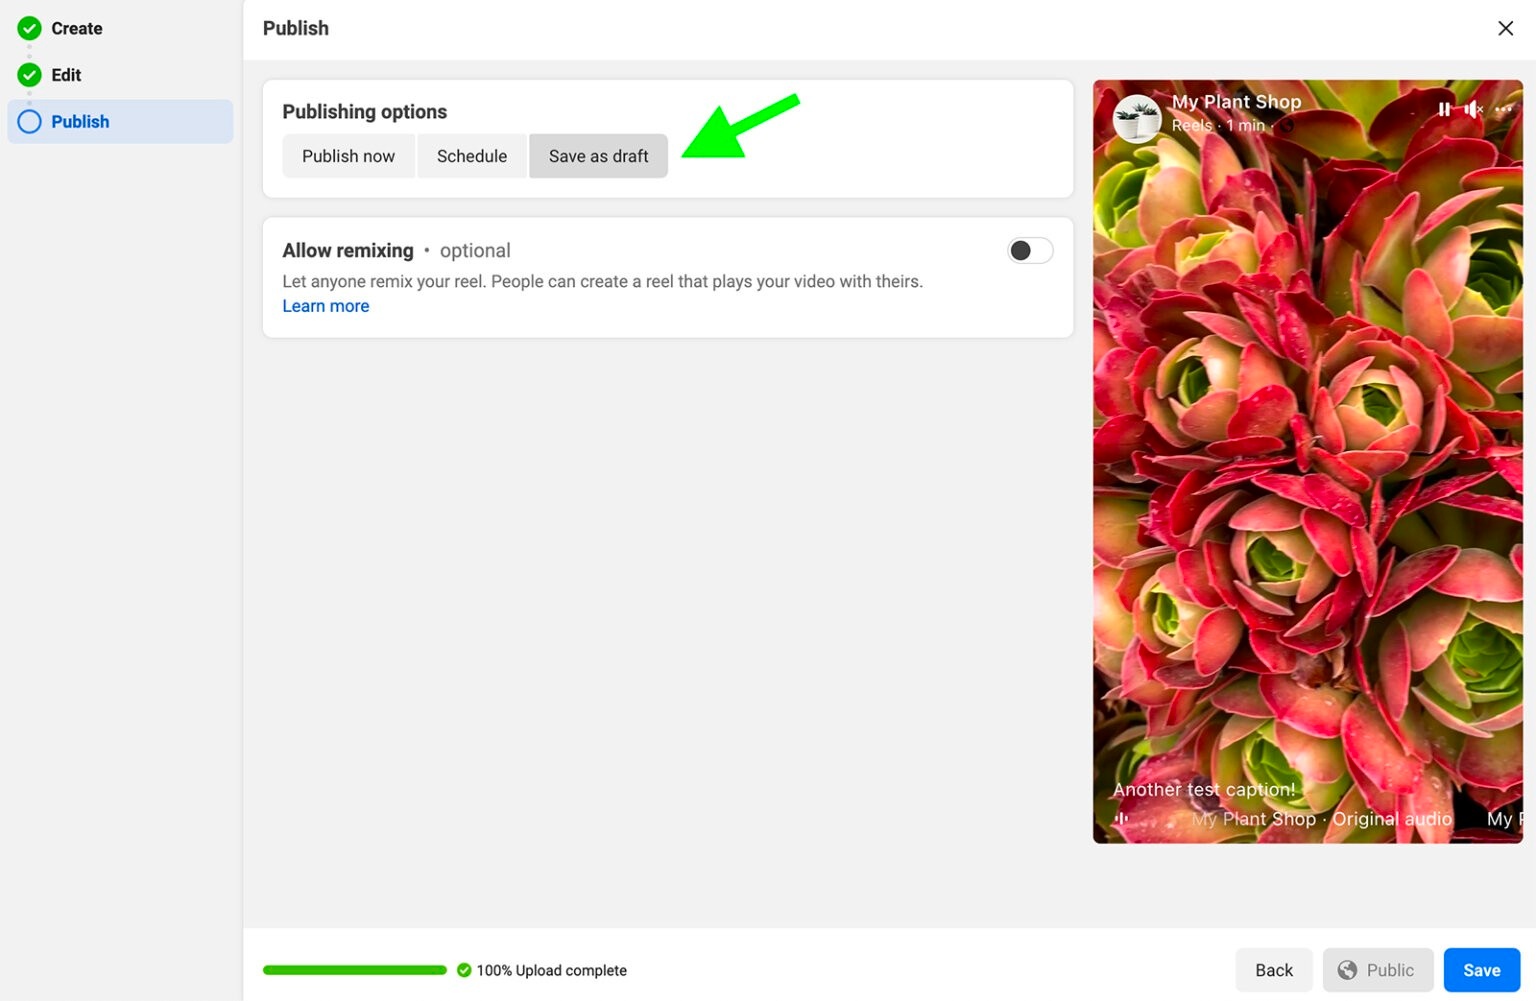
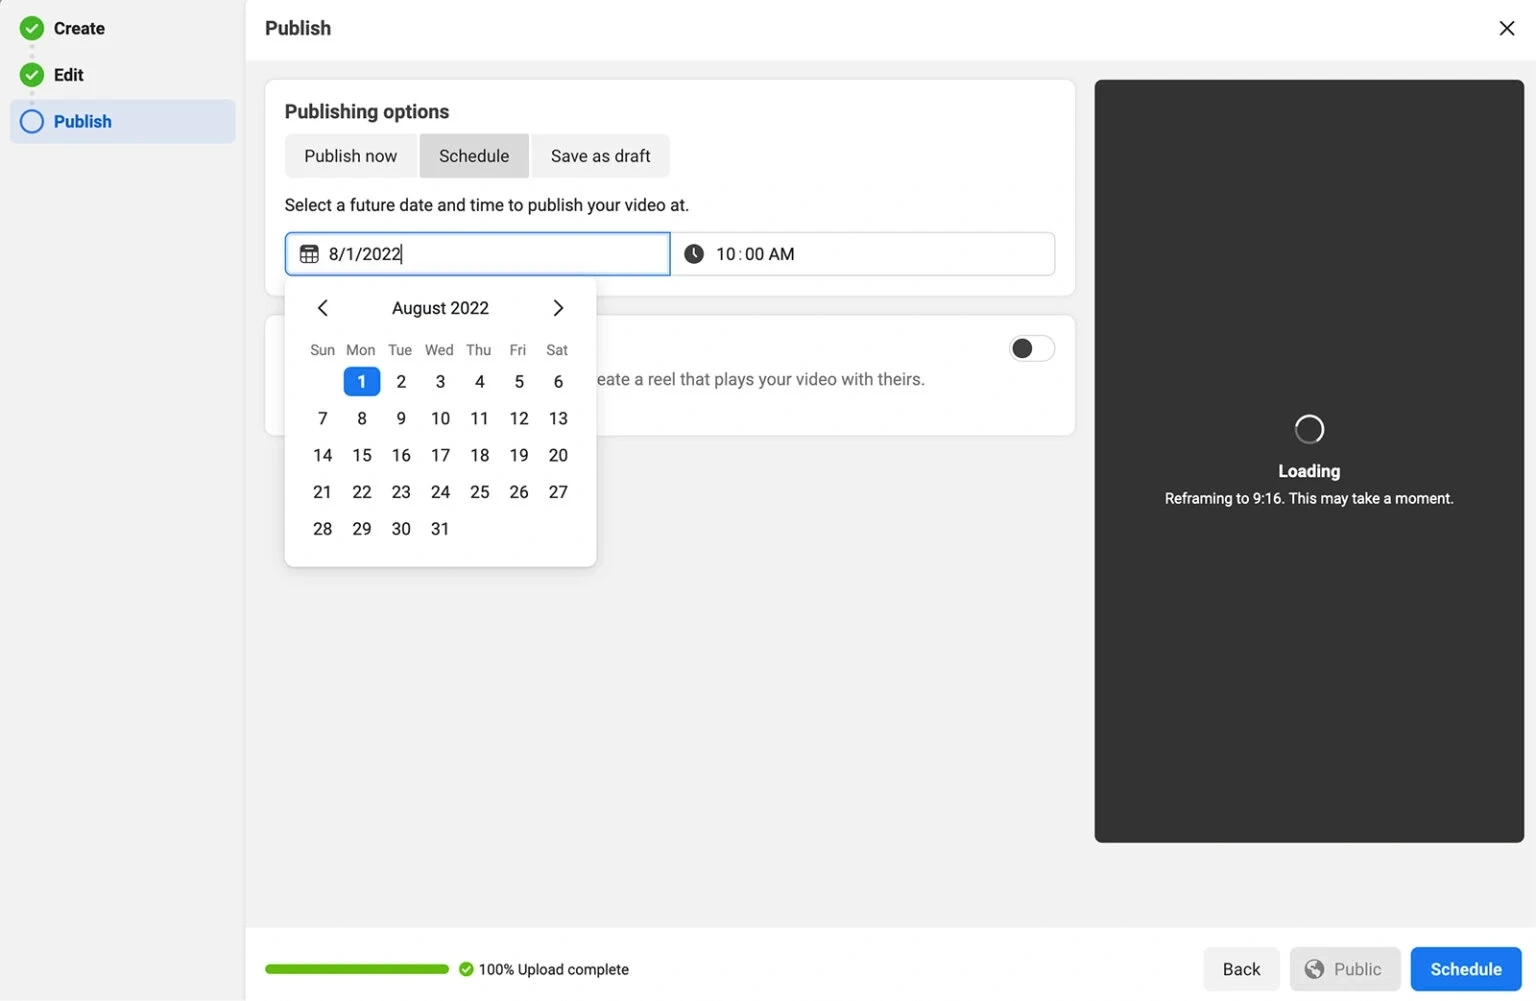
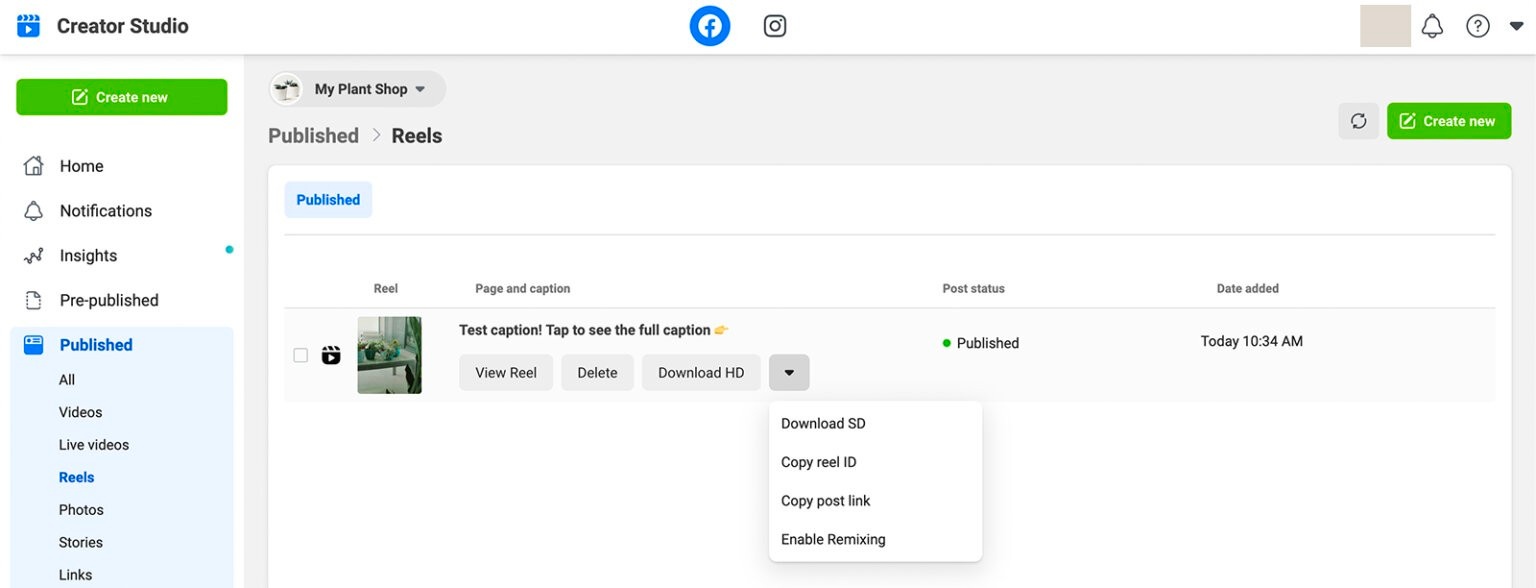
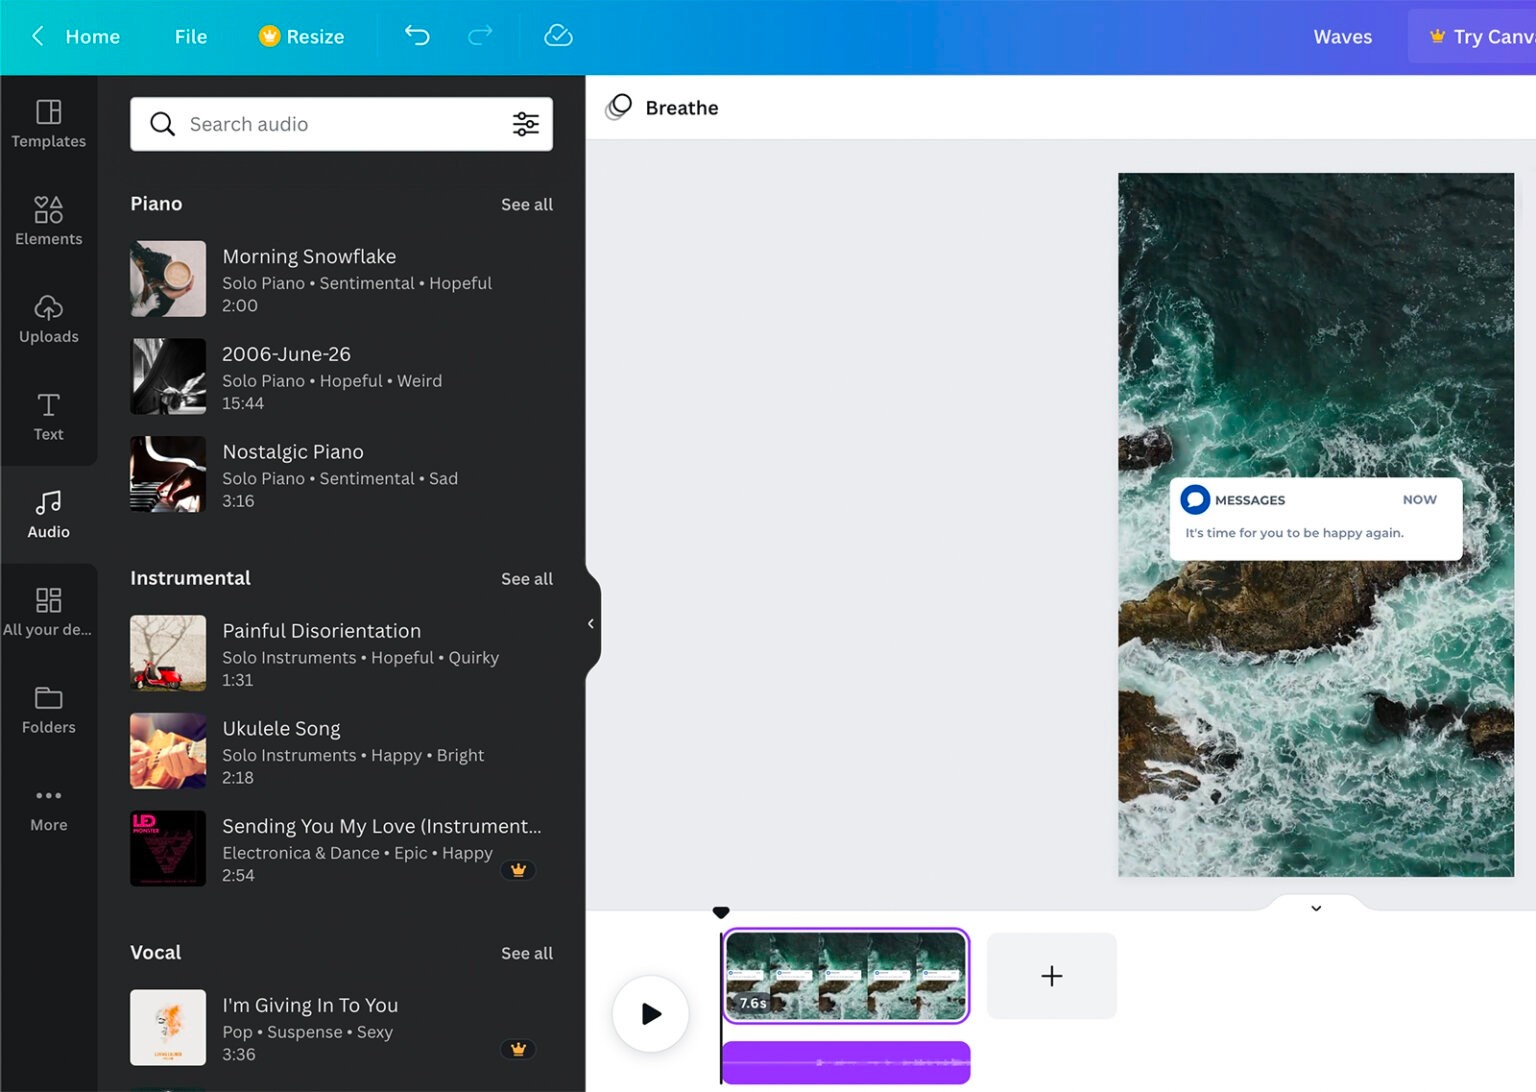
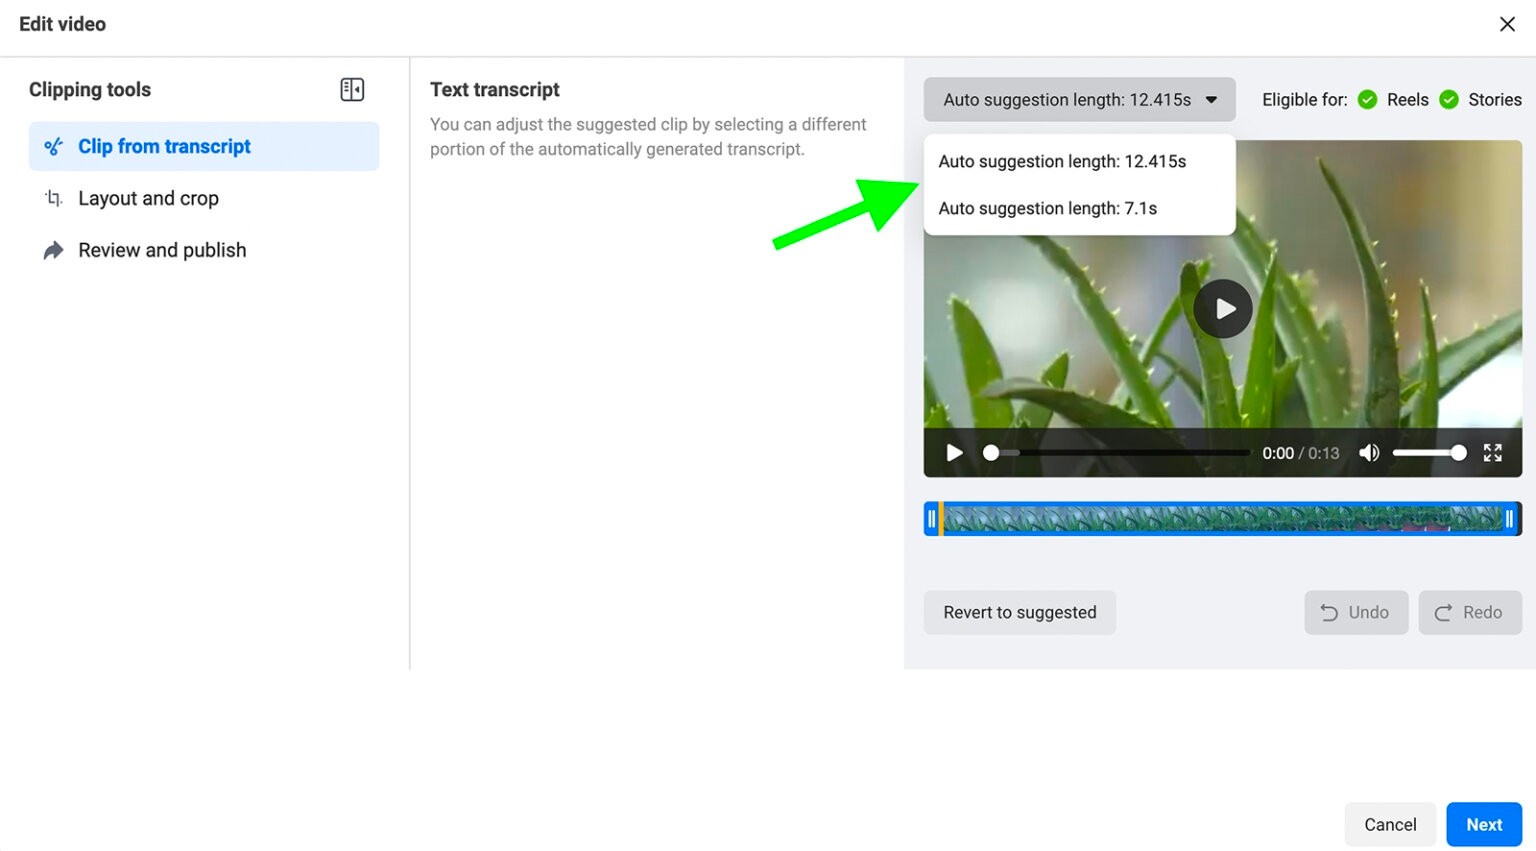
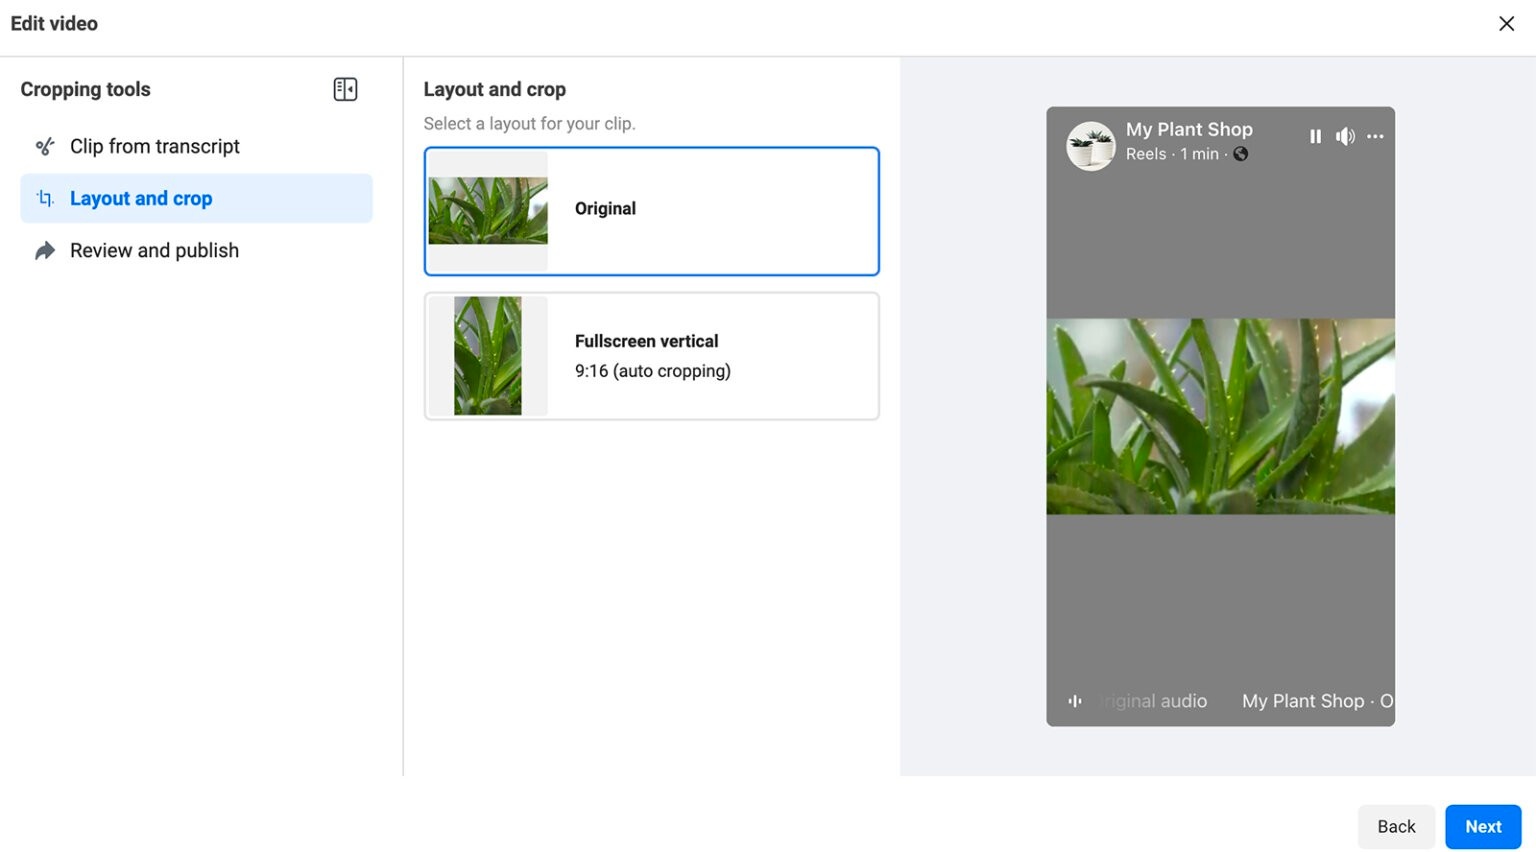
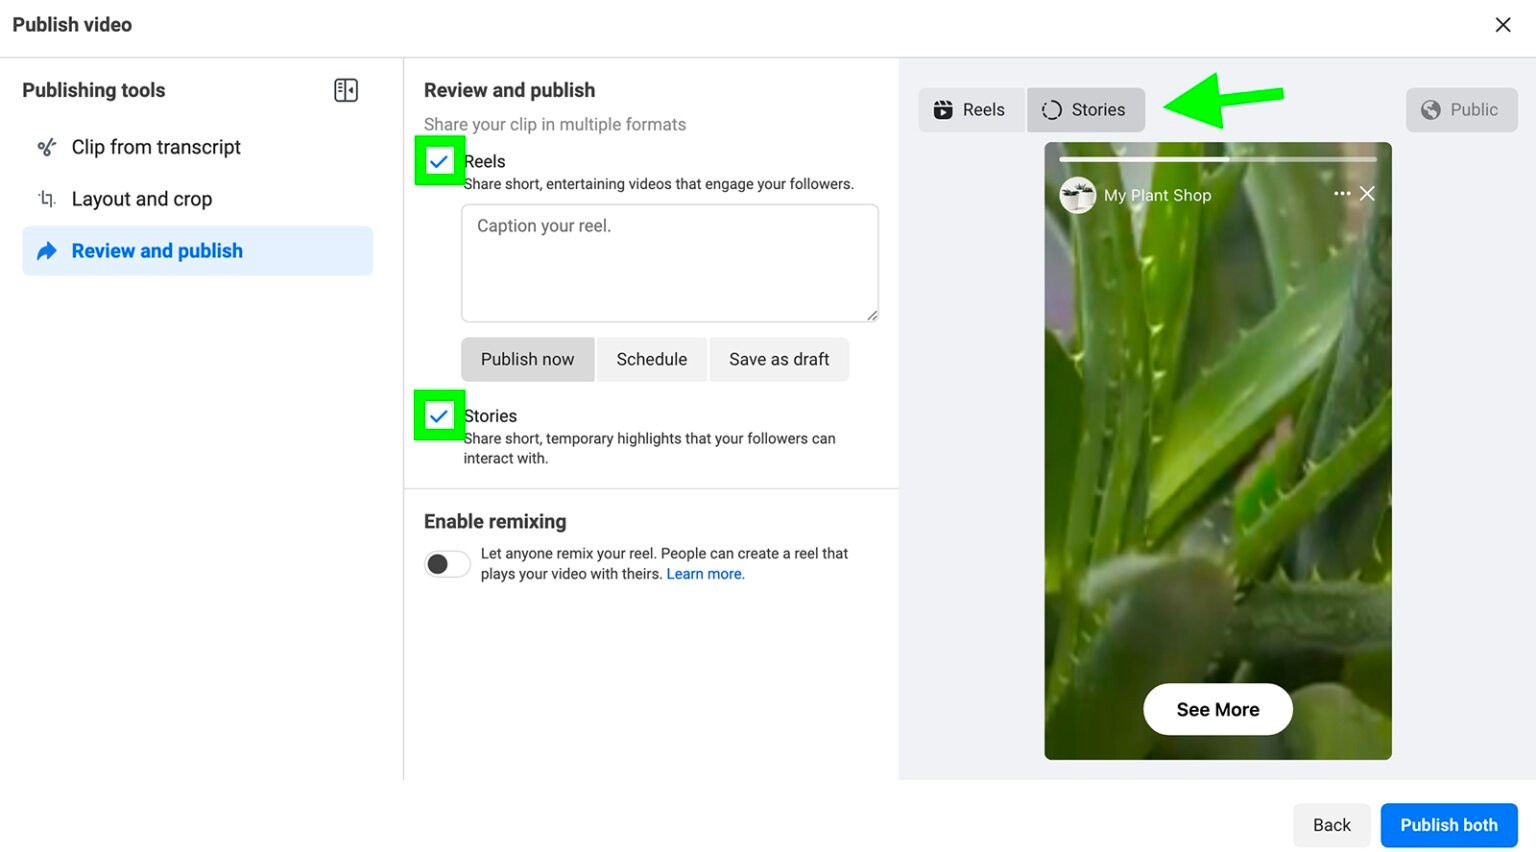
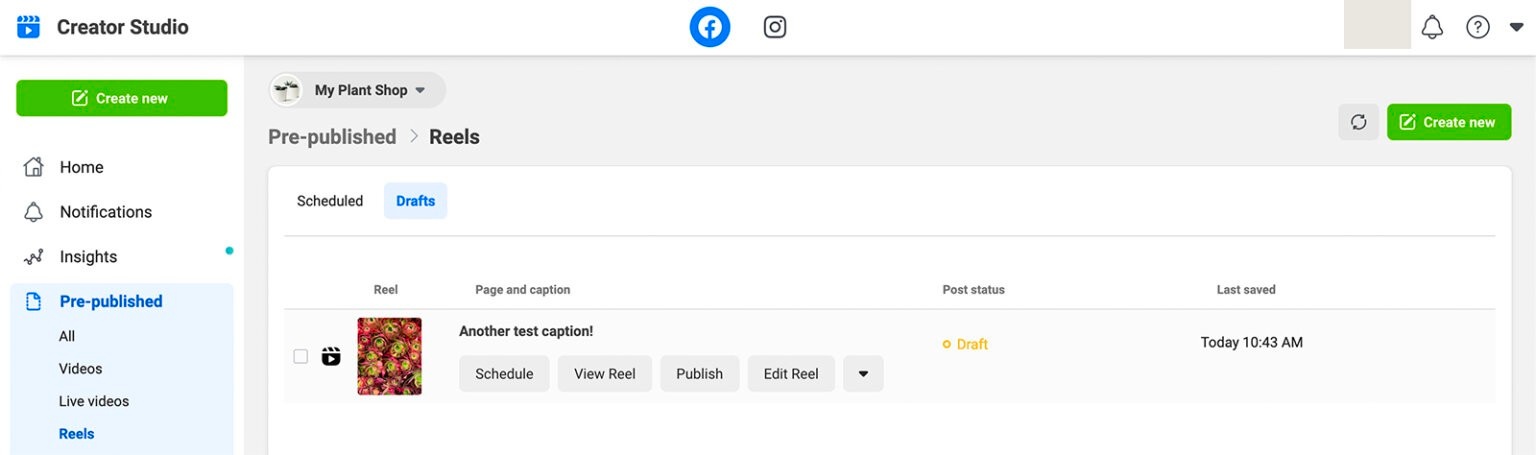
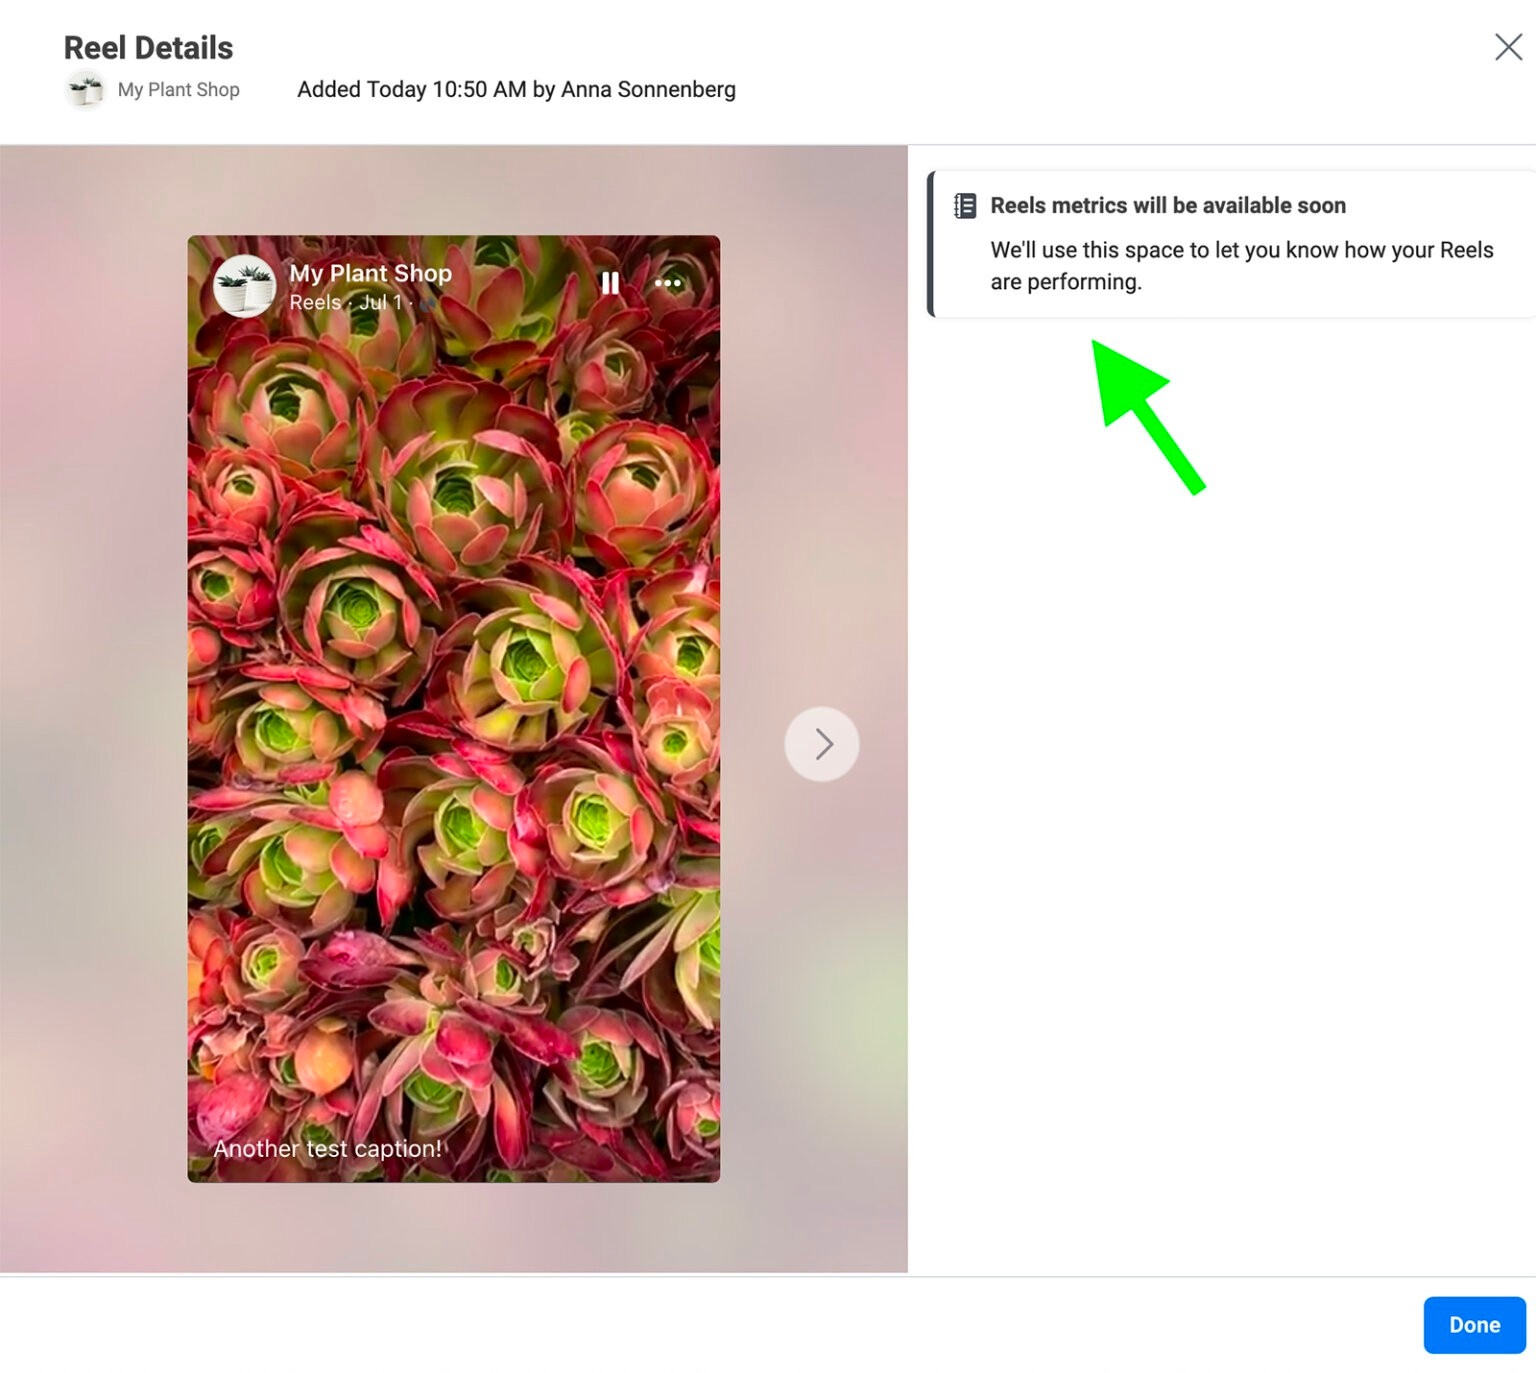
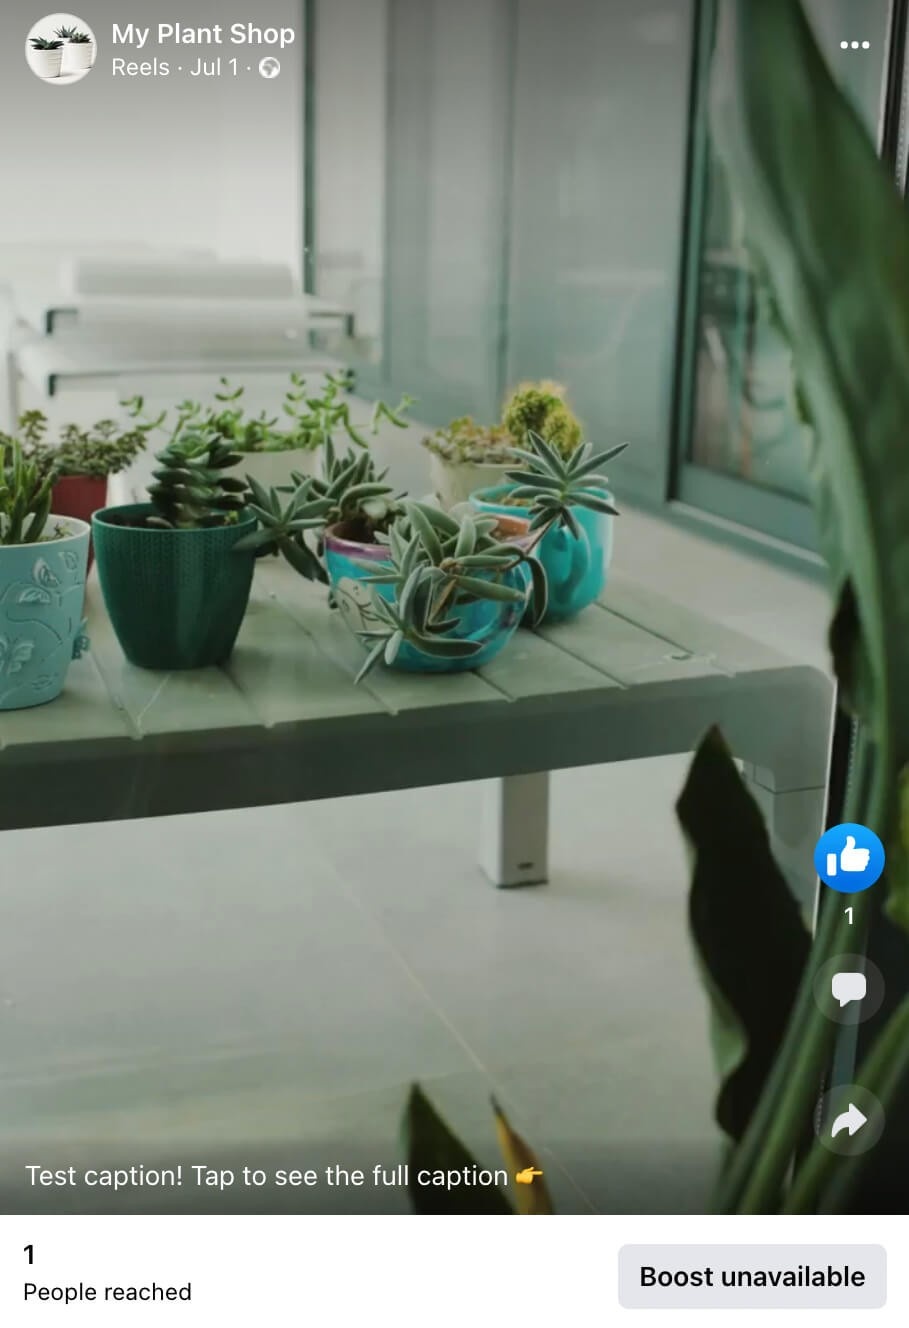
Want to streamline your Facebook Reels production? Looking for a way to schedule your reels to publish at the best time? In this article, you’ll learn how to make, schedule, and publish Facebook Reels content on desktop using Meta’s Creator Studio dashboard. Since launching Facebook Reels in late 2021, Meta has quickly rolled out a variety of new features, ranging from voiceovers to audio synchronization. But despite the short-form video format’s rapid rise in popularity, Meta has limited users’ publishing and scheduling options—at least until now. As of June 2022, Meta is gradually rolling out Facebook Reels desktop publishing in Creator Studio. That means you can now create and publish reels to your Facebook page using Meta’s free desktop dashboard. The flexible scheduling for Facebook reels from Creator Studio gives you much more control with publishing times. Brands now have three options for creating and editing Facebook reels in Creator Studio. Let’s look at how to upload new reels and how to repurpose clips from existing videos. To create a new reel, open the Creator Studio dashboard and select a Facebook page. Click Create Reel from the main post composer at the center of the dashboard. Alternatively, you can click the green Create New button in the upper-left corner and select Create Reel from the drop-down menu. As soon as you click either button, you’ll see a prompt to upload your short-form video. Upload your video and allow the dashboard to process the file. You’ll see a 100% Upload Complete confirmation when the file is ready to go. Next, copy and paste a caption from your social media content calendar or write a new one. The character count for Facebook reels appears to be the same as Facebook posts: over 60,000 characters. But only the first two or three lines display before Facebook truncates the rest so make sure you include the most important copy at the very beginning. Once you’ve written your caption, click the Next button in the lower-right corner to start editing. But beware: unlike the Facebook app, Creator Studio has extremely limited options for editing reels. Fortunately, Creator Studio does let you trim your Facebook reels before publishing. Use the slider to trim content from the beginning or end of the video. With Creator Studio, you can also resize videos so they display as 9:16. Even if the original video you uploaded already has a 9:16 aspect ratio (as in this example reel), it’s a good idea to double-check the size and layout in your Creator Studio dashboard. If it appears to have a different aspect ratio, select 9:16 to ensure it displays as a full-screen video. When you’re satisfied with all of the edits, click the Next button. From the final screen, you can finish publishing or scheduling your reel. (See the walkthrough below.) As Meta increasingly focuses its platforms around short-form video, you’re likely to find more prompts to publish content in Reels format. When you go to publish a video in Creator Studio, you might see a prompt like the one below. Instead of proceeding to publish your short-form video as a reel, you can click to open the Reels composer instead. Don’t love how it looks? You can click to go back to the video composer and continue with your original post. But if you want to proceed with publishing your content as a reel, you can use the workflow we covered above. Add a caption, trim your video, and resize it to display as a vertical full-screen video. If you do resize your video, double-check the quality before publishing. Resizing from a horizontal to a full-screen aspect ratio may cause issues with your video quality. And while you can certainly publish a horizontal video to Reels, it may not perform as well as 9:16 content. Does your page already have an extensive library of video content? In many cases, you can repurpose the videos you’ve already published and turn them into reels. If you’re looking to get more mileage out of your video content or you want a simple way to get started with Reels, repurposing is a great option. To repurpose a video from your Facebook page, open the Published drop-down menu in Creator Studio. Go to the Videos tab and find a video you want to use. Hover over your published content to see more options. Then click Create Clip. When you select this option, Creator Studio automatically opens its video clip interface. If your video includes dialog or a voiceover, Creator Studio automatically transcribes the speech. You can use the transcript to adjust the clip so it works well as a short-form video. Whether or not Creator Studio successfully creates a transcript for your video, you always have the option to trim your video manually. Use the slider to set the beginning and end times for your video. Then click the Next button to review the resizing options. The layout and cropping options for clips should look familiar. Similar to the Reels composer, the clips composer lets you choose a layout to apply to your Facebook reel. You can stick with the original or switch to a full-screen vertical format that’s ideal for Reels. On the Review and Publish tab, write a caption for your reel. Then choose whether you want to publish your reel right away, schedule it for another time, or save it as a draft so you can review it later. Before publishing any reel from Creator Studio, make sure to double-check the remix settings. By default, Facebook allows any user to remix any public reel, which means anyone can use your reel in their own content. If you want to give customers, peers, and creators the option to respond to or build on your reel with their own content, it’s a good idea to leave this option on. But if you’d rather opt out, turn off the remix switch. Now you can publish your reel from Creator Studio. To post it to your Facebook page instantly, click the Publish button in the lower-right corner. It may take a minute or two to appear on your page. Do you need a team member to review your reel before it goes live? Instead of publishing instantly, select Save as Draft. Then click the Save button to keep your work for later. Anyone who has access to your business page in Creator Studio can go to the Reels tab under the Pre-Published menu to view drafts. From there, team members can continue editing the reel. But note that you can’t resize or trim reels you’ve saved as a draft. The only editing option available here is updating the caption. Once you’ve gotten approval to post the reel, you can publish or schedule it from the Pre-Published tab. Click Publish directly from the Pre-Published tab or open the editing dashboard and navigate to the Publish screen. If you’d rather publish your reel at a preset time, select Schedule from the list of publishing options. Click the calendar icon to select a date and then enter a time. You have to schedule reels at least 20 minutes in advance, and you can schedule up to 75 days out. To finish the process, click the Schedule button in the lower-right corner. Like drafts, you can view all scheduled reels from the Pre-Published tab in Creator Studio. (Note that scheduling isn’t available for clips from published videos.) Either way, you can view all of the reels you’ve posted on the Published tab in Creator Studio. Open the Published drop-down menu and select Reels. From here, you can view, edit, or download your post. You can also create a new reel from this screen by clicking the Create New button in the upper-right corner. Making reels in Creator Studio is relatively straightforward. But with the tips below, you can improve your workflow and get more out of your content. The editing tools available in Creator Studio are incredibly limited. The dashboard doesn’t allow you to add audio tracks, voiceovers, or text overlays during the editing process. That means it’s essential to add these elements beforehand. You have a couple of options for uploading fully edited reels. If you’ve already produced short-form videos for Instagram, YouTube, or TikTok, you can consider uploading those video files to Creator Studio. But because Meta tends to prioritize original content, repurposing short-form videos from other platforms may not be a good long-term solution. Instead, consider using a third-party tool to design and edit your reels. If you want to complete the entire process on desktop, Canva is a convenient solution. You can use the design app’s Reels templates or develop your own designs, and then record voiceovers for your own original audio or add music from the app’s royalty-free library. Creator Studio’s video clipping feature is helpful for getting more value from content you’ve already created. If you can’t decide how best to turn a longer video into a clip that’s 60 seconds or shorter, you can use the dashboard’s automated suggestions. On the Clip from Transcript screen, click the Auto Suggestion Length drop-down. From there, you can choose from the automatically generated clip lengths, which all have different start and end timestamps. Whether you’re using the video clipping feature or you’re creating a new reel from a video post, you’ll probably have a couple of very different aspect ratios to consider. The vertical full-screen aspect ratio might seem like the obvious choice. But if your video doesn’t translate smoothly to a vertical aspect ratio, it may be worth testing your reel using its existing aspect ratio. Since reels are still relatively new to Facebook, now’s a good time to experiment and gather data. When you use Creator Studio’s clipping feature, you can experiment with various lengths and content types, too. For example, you can clip a longer video into multiple different reels to see what prompts your audience to respond. If you’re looking for ways to streamline your content creation workflow, there’s another reason to like Creator Studio’s video clipping feature. You can create content for Facebook Reels and Stories simultaneously. Creator Studio automatically creates a story that clips from your reel. Then Facebook users can tap to visit the reel and view it in full. Both Reels and Stories publishing are on by default when you use the clipping feature. If you don’t want to publish to both, note that you have to uncheck Stories before scheduling. Prior to this Creator Studio launch, reels could only be published through the Facebook mobile app, making it difficult to share drafts. If you’re tired of screen recording your reels drafts for review before publishing, Creator Studio could change your workflow completely. Now you can save all of your reels drafts to Creator Studio so colleagues or clients can view them before they go live. Since your entire team can access drafts through Creator Studio, you won’t have to worry about how to share the content from your device. Once your reels are live, anyone on your team can also access the content and change settings from the Creator Studio dashboard. That means you can enable or disable remixing directly on desktop. Before this launch, Facebook required creators to publish reels in real time. If your brand publishes a lot of reels or if you have a lot of marketing tasks to juggle, real-time posting isn’t exactly convenient. Now you can schedule Facebook reels to publish at the ideal time, up to 75 days away. Although Creator Studio doesn’t yet suggest an optimal time to post, you can identify the best times for your audience using your own insights. As of June 2022, Creator Studio allows for reels creation, publishing, and scheduling only. Unlike the other tabs under the Published menu, the Reels tab doesn’t provide insights. But the dashboard indicates that Reels insights will be available soon. If they’re anything like Instagram Reels insights, the analytics in Creator Studio could show plays and likes as well as engagement like comments and shares. In the meantime, you can check your Facebook page for basic insights on reels performance. There, you can see reach, reactions, comments, and shares for each reel. Then you can identify your top-performing reels and use them to inform your content strategy.Can You Publish Facebook Reels From the Desktop?
#1: How to Create Facebook Reels on Desktop in Creator Studio
Upload New Facebook Reels in Creator Studio


Publish Facebook Videos as Reels in Creator Studio
Use Video Clips of Existing Content to Make Facebook Reels in Creator Studio
#2: How to Publish Facebook Reels on Desktop in Creator Studio
#3: How to Schedule Facebook Reels on Desktop in Creator Studio
Pro Tips and Advice for Publishing Facebook Reels in Creator Studio
Add Audio and Text Before Uploading Reels
Use Creator Studio’s Clip Length Suggestions
Experiment With Aspect Ratios and Clip Lengths
Publish Reels Clips to Facebook Stories
Create a More Efficient Approval Workflow
Find the Optimal Time to Publish on Desktop
Use Reels Insights to Optimize Content
Want To Turn Your Facebook & Instagram Into an ATM?
Inside my Facebook ads mastery course you'll discover the foolproof Facebook and Instagram ads formula to scale your business to $100K+ per month profit!
When you sign up you'll learn:
